
Kennt Ihr das, dass man sich in einer Sache so richtig
verbeißt? Mir ging es so im Februar. Endgültig keine Lust mehr auf Winter
beschloss ich mich an ein Frühlingsprojekt zu setzen, dass ich schon lange im
Hinterkopf hatte. Ich wollte eine Tulpe falten, eine richtige Tulpe. Das heißt,
die Blüte soll aus sechs Blütenblättern bestehen, die einen inneren und einen
äußeren Kreis bilden.
Die meisten Origami Tulpen haben vier Blütenblätter und der
Rest wird angedeutet. Mittlerweile weiß ich auch, warum das so ist, denn bis
Ende Februar hatte ich nur einen Haufen zerknülltes Papier gefaltet. Manchmal
war es auch zerrissenes Papier.
 |
| Tulpe - Stand Anfang März |
Ich besann mich also auf meine eigene Regel: Wenn Du einfach
nicht mehr weiter kommst, dann mach erstmal was anderes. Gesagt, getan, ich
habe eine Kirschblüte hervorgekramt, die ich vergangenes Frühjahr entwickelt
hatte. Bei näherem Hinschauen erinnerte mich die Rückseite des Modells an
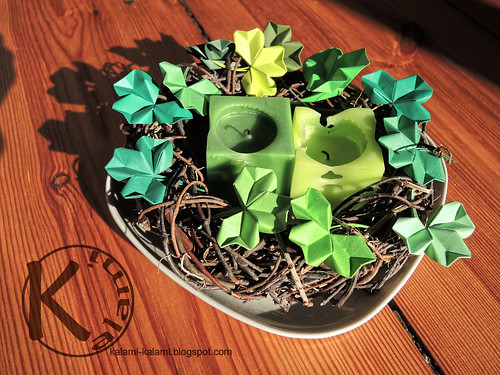
Kleeblätter. So war ein neues Projekt geboren, das wesentlich erfolgreicher
verlief und pünktlich zum St. Patrick’s Day konnte ich auf Flickr meinen
Kleeblattkranz präsentieren.
Zeit für einen Blogeintrag hatte ich Mitte März nicht, daher
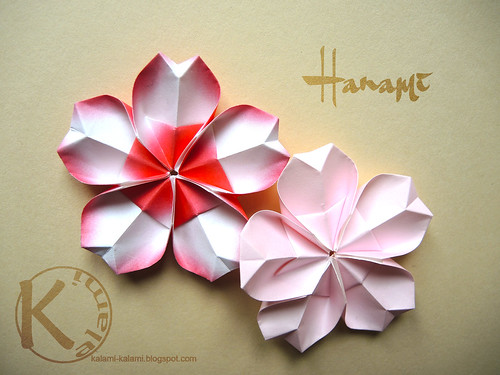
kommt der Artikel dazu nun. Anlass sind aber eigentlich nicht die Tulpe und
auch nicht das Kleeblatt, sondern die vorher bereits erwähnte Kirschblüte. Eine
Anleitung dazu befand sich letztes Jahr im Tagungsband von Origami Deutschland
und ich dachte mir, dieses Jahr kann ich die ja pünktlich zum Fest der
Kirschlüten auf meinem Blog veröffentlichen. Dieses japanische Frühlingsfest
fällt in der Regel auf die allerletzten Märztage, bis hin zu den ersten
Maitagen. Dieses Jahr hat es aber
bereits begonnen, da die Temperaturen ungewöhnlich hoch waren. Auf dieser Seite
kann man verfolgen, wie sich die „Kirschblütenfront“ über die japanischen
Inseln bewegt.
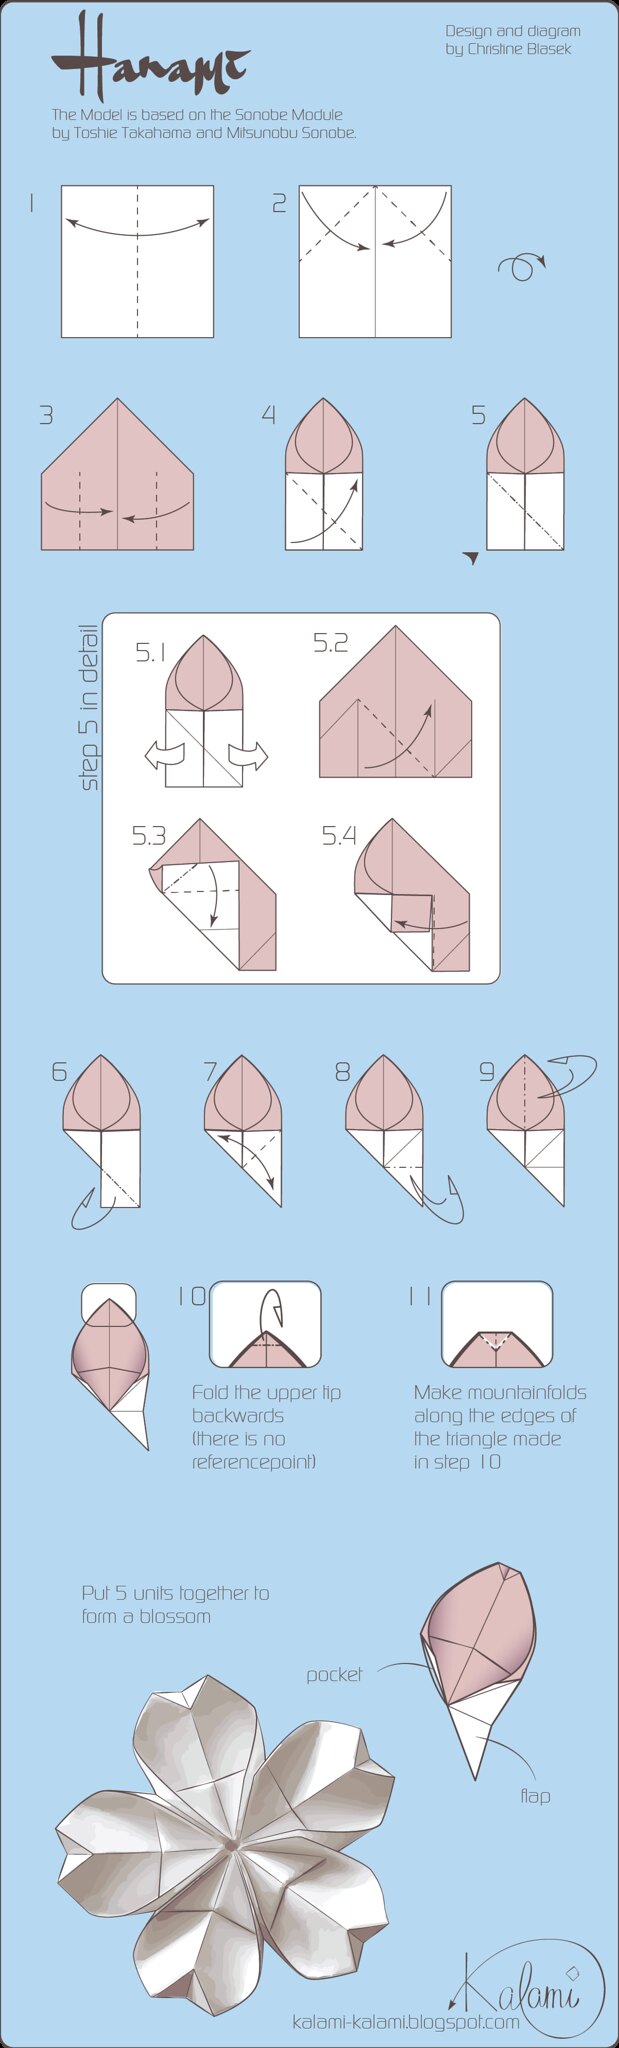
So habe auch ich mich nun gesputet und rasch das Diagramm
überarbeitet und auch wieder ein kleines Filmchen erstellt, das als zusätzliche
Erklärungshilfe dienen kann. Ich hoffe Ihr habt Spaß beim Falten! Runterscrollen, da is dann das Diagramm...
Do you know
the feeling, when you get completely stuck into an idea? This was me in
February. Absolutely tired of winter I decided to start with a spring project
that I was planning to do for a long time now. I wanted to fold a tulip, a more
realistic one. This means six petals forming in inner and an outer circle.
Most of the
Origami tulips have only four petals and the rest is just implied by the
remaining paper. Meanwhile I know why, until the end of February I haven’t
produced more than crumpled or even ripped paper.
 |
| Tulip - state end of March - still not satisfied |
So I reminded
me of my own rule: If you are completely stuck, do something else. A word and a
blow. I dug up a cherry blossom, which I’d designed last spring. Taking a
closer look at the model, I thought the backside looks like the leaf of a
shamrock. A new project was born, that was much more successful. Just in time
for St. Patrick’s Day I presented a shamrock wreath at Flickr.
In the
middle of March there was no time to write a blog post, that’s why I’m doing it
now. But this post is not about the tulip neither the shamrock. It is about the
cherry blossom I mentioned earlier. A diagram was published in the convention
book of Origami Deutschland last year and I thought this year I could publish
it on my blog when the cherry blossom festival is starting. These Japanese
spring celebrations usually take place on the last days of March to the first
days of May. This year it has already begun due to warm weather. On this
homepage you can see the current cherry blossom forecast.
Einfach superschön. Diese Blüten muss ich auch machen! Vielen Dank!
AntwortenLöschenVielen lieben Dank für Deine beiden so lieben Kommentare.Ich hoffe Du kommst mit den Anleitungen zurecht.
AntwortenLöschenIch bin wirklich begeistert - wow. Wunderschön! LG Isabella
AntwortenLöschenDankeschön Isabella!
LöschenHow about adding a yellow-orange colored pencil line on the top/center of each petal of the tulip? That will give you the more flowy, more natural design of the tulip that you are probably after. Or, once you figured out exactly where these lines should go, you could dip a qtip in clorox and 'draw' the lines onto the paper, so that it stays 100% paper art? Hope these suggestions help you make you happy with your design.
AntwortenLöschenKind regards, Rose
BTW I personally think it is already lovely as it is, but I also know the feeling of 'being stuck'. Good luck.
Thnak you for your kind comment, Rose.
LöschenMy problems with the tulip are not really the paper and colour, it's more about the units itself. They are not easy to assamble and the paper often rips, because there is so much tension. But when I find a nice way to fold it, I will come back to you suggestions.
Hi. i just discovered your website and this model recently. Meaning no disrespect, I feel that I have seen a very similar model to this designed by Tomoko Fuse and many replica tutorials on Pinterest.
AntwortenLöschenHi Anonymus,
Löschenabout one and a half years ago I folded the blossom together with Tomoko Fuse, when she was special guest at the Ooraa Convention in Lyon (2017). I asked her the same question and she insisted on saying, this is my own model. Nevertheless, as the design is based on the sonobe unit, I made this clear in the introduction of the diagram.